Step-by-Step Tie-Dye Instructions
- Stephanie Henkel
- Oct 8, 2023
- 4 min read
Updated: Oct 17, 2023
When you purchase through links on our site, we may earn an affiliate commission
Tie Dying with kids

Tie Dying Is A Traditional Craft
As far back as the sixth century, ancient craftsmen in Asia and Africa evolved many ways of painstakingly folding and tying fabric to create detailed designs. Although tie-dying techniques have been used for centuries with many intricate variations, modern-day tie-dying in the US only became popular in the 1960s during the hippie movement. It was a cheap and easy way to create bright, original designs on T-shirts and other clothing that fit in with the renewed interest in fabric arts and crafts. Today the availability of better and cheaper dyes and tie-dye kits make it easy for anyone to create a beautiful T-shirt with one-of-a-kind designs. So pick up some t-shirts and a tie kit and join the fun!
[As an Amazon Associate, I earn from qualifying purchases.]
Supply List for Tie Dye
Fabric dyes (Tulip Tie-Dye kits are great because they include everything you’ll need except the shirts, racks and paper towels.)
Plastic bottles with an applicator tip
Rubber bands (about 4-6 for each shirt)
Plastic gloves
Plastic table cover (some kits come with a small plastic cover.)
Wire rack (cake cooling rack works well)
Paper towels
T-shirts (100% cotton) to dye, We used men’s t-shirts and some smaller sizes kid's t-shirts for the younger kids.
The Tie-Dying Process
1. Gather All Materials, Cover the Table with a plastic cloth, and have all other materials on hand. Dyes will stain furniture, floors and skin, so it’s important to use protective covers and gloves.
2. Wet the shirt with water. Wet cloth accepts the dye better and colors will blend nicely. Either put shirts in a basin of clean water and wring out excess water before folding.
3. Fold Shirts and Secure Them with Rubber Bands. We found it easiest to fold all of our t-shirts and rubber band them before mixing the dyes. That way, we didn’t have to take the plastic gloves off and on but once. Kits come with directions for folding to get different designs. (See some design patterns below.)
4. Prepare Dye. Put on protective gloves and add water to the dye bottles according to instructions. Secure tops and carefully shake over a sink to mix. Kids should be supervised because if the tops come off, you’ll have a mess! Be sure to rinse off the outside of the bottles so that the dye doesn’t drip on the floor. We put dye bottles on a small cookie sheet to keep drips contained.
5. Prepare the Dying Area. Each person should have their own dying area with a few layers of newspapers or paper towels under a cooling rack. Have extra paper towels ready to replace used ones.
6. Dye T-shirts. Be sure t-shirts are still wet (not dripping) and that each person is wearing protective gloves. Place the tied shirt on the cookie rack and start dying a section at a time. The dye will come out pretty fast, so apply it carefully to one section of the shirt at a time. The colors look best if you limit them to 3 or 4 colors for each shirt. If you mix too many colors, you’ll get a muddy look. Some colors when mixed together will make brown (ex: red and green, purple and green) so try not to have them next to each other without some white between them. Turn the shirt over and do the backside. It’s okay to have some white showing. Much of that will go away as the dye soaks into the shirt.
7. Wrap dyed shirt in plastic. We used plastic grocery bags, one for each shirt.
8. Let wrapped shirts sit for at least 6 hours. We piled our plastic-wrapped dyed shirts into a dishpan and left them overnight.
9. Rinse t-shirts one at a time under running water. If the weather is good, this is a good time to move the process outdoors! Wear protective gloves to avoid getting dyed hands! With kids, the rinsing works best if done outdoors with a hose. We draped our shirts over a low wall and rinsed ours with the hose first, then dropped in a bucket of water and rinsed some more.
10. Wash t-shirts in a washing machine. Once excess dye is rinsed out, wash shirts in a washing machine. Use the hottest water available and a large load setting. You may add a small amount of detergent. T-shirts can be dried in a dryer or hung on a clothesline. We enjoyed hanging them on a clothesline so that we could see all the different colors and patterns!
[As an Amazon Associate, I earn from qualifying purchases.]
Traditional Tie-Dying Designs and Patterns
These are a few of the traditional tie-dye designs we tried, along with tips on how to achieve them.
SPIRAL DESIGN T-SHIRT

Spiral Design Instructions Our favorite design was the spiral or double spiral.
1. To get a spiral, lay the shirt out flat, pinch a spot where you’d like the eye of the spiral, and twist.
2. As you twist, the shirt will fold into a rough circle that you can push together a little with your hands.
3. Use rubber bands evenly placed to hold the shirt together.
4. Lay the shirt aside and go on to the next one.
BULL'S EYE DESIGN
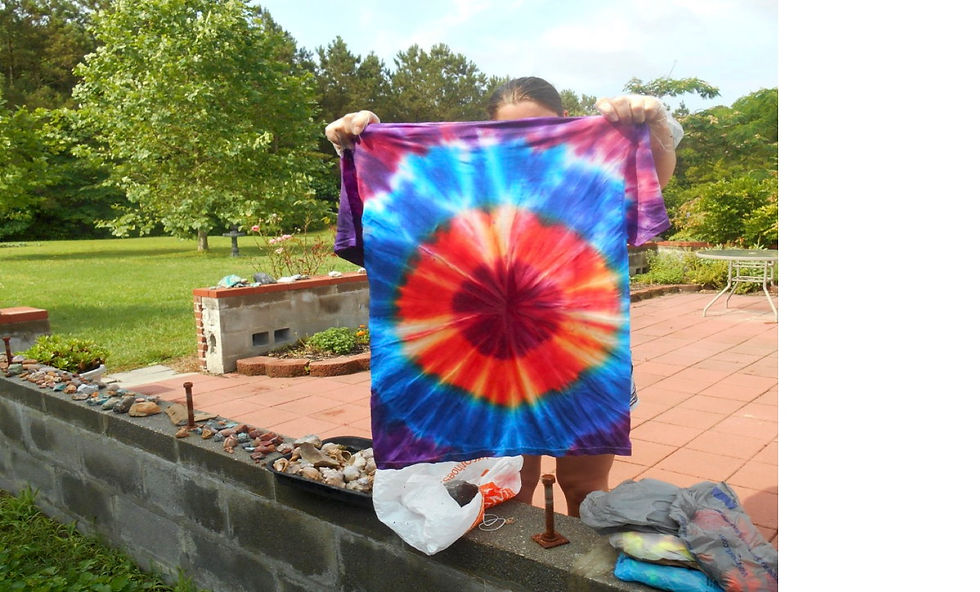
Bull's Eye Design Instructions The bull’s eye design was another of our favorites. This one is even easier!
1. Lay the shirt flat and pick it straight up by a spot where you’d like the center of the bull's eye.
2. Rubber band starting about 2 or 3 inches from the top and place rubber bands every few inches.
Crunch Design

Crunch Design Instructions The crunch design is the easiest of all, as you just crush the shirt into a mass and band it together using 4 or 5 rubber bands.
As you can see, we had so much fun with this project that we ended up dying many, many shirts! I hope you've enjoyed tie-dying as much as we did!
Happy Crafting,
Stephanie
Kommentare